Category Archives: Striping Business Startup Articles

Parking lot business / company startup articles. Financing, marketing, new and used striping equipment, business plans and other articles.

Pricing, Bidding or Estimating Jobs

The task of pricing or bidding parking lot striping jobs is sometimes overwhelming for new striping or sealcoating companies. It is normal to be apprehensive of things you have never done, however, the process of estimating a parking lot striping or sealcoating job does not have to be complicated. The best way to make this process manageable is to break the task down into smaller sections.  Using our STRIPE-CALC or STRIPE-INVOICE spreadsheet will also help make the process much simpler.

When I price a parking lot my goal is to receive about 20 cents per linear foot of four inch striping, sixty cents per linear foot for the curbing that runs along the front of many shopping centers, and $50 – $60 per hour plus materials for logos and markings that can’t be calculated by the linear foot. An example of these would be arrows, light bases, bumpers, handicap logos, etc… Remember that your prices may be higher or lower depending on your market.

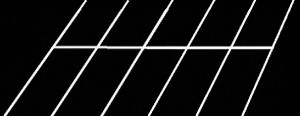
When I arrive at a location to do a bid the first thing I do is count and record the number of 4″ lines in the lot. These are the parking stall lines that make up the bulk of the striping that you will be doing. There is no need to measure every parking space line. This would take you all day. Simply count the number of car spaces. If there is a line separating cars that park nose to nose like in the picture below that will be calculated separately. One thing to note is that in the picture below there are spaces for 10 cars. However, if you count the lines there are 12. So if you have a block of spaces holding 100 nose to nose cars you will in most cases have 102 lines for that block because you have to have two lines at the end to start the block. If you don’t count the extra two that is fine but if you had 20 blocks of spaces in a large parking lot you would be giving away $160. After I count up the 4″ lines I multiply the number of spaces by $4 which is a shortcut for adding up all the linear feet and multiplying by 20 cents. Then I calculate the linear footage of all the other 4″ lines in the parking lot and multiply by 20 cents. This will include the centerline between nose to nose parking, firelane striping, the lines down the middle of the road and any hatch areas. You should now have a total for all of the 4″ lines in the lot.

After you have done this you are going to want to calculate pricing for the other markings in the parking lot such as logos, stop bars, arrows, light bases and bumpers. I normally charge $15 – $25 for a basic arrow depending on the size, 60 cents per linear foot for curbing, $10 per car stop (parking lot bumper), and $20 per light base. You will need to make a list of typical items and pre price them. A way to price odd items like this is to take the amount of time it will take you to paint the item then multiply that a $ rate per minute. (I use $1 per minute or $60 per hour) Then add the cost of your materials times two to that number. For example, if it will take 20 minutes for you to paint a light pole base and $2 in paint you would charge $20 plus $4 for a total of $24 per base.

For potholes that I can patch with bagged asphalt I usually price the same as I do miscellaneous items. I double the cost of my asphalt and then estimate the time it will take to apply it, multiply that by a dollar per minute, and add those number together.

Here is an example of a simple parking lot.

120 spaces – $480
400 feet of centerline – $80
400 feet of other 4″ – $80
300 feet of curbing – $180
6 medium arrows – $90
2 – 12″ x 20 stop bars – $48 (1.20 per linear foot x 40)
2 pot holes – $40 (20 minutes times $1 plus ($10 x 2) for materials)

Total – $998

To keep things simple, set a per linear foot price for 4″ and other width striping and apply that to as much of the lot as possible. Then set your prices for odds and ends. As previously outlined, use the double the materials plus $50-$60 per hour approach for these miscellaneous items. When you price by the linear foot, keep in mind that the hourly rate, materials etc.. are all in that per linear foot price. You will not need to calculate those items in again.

There are other ways to price but this is the method that I find the most logical and straight forward. I hope this information is useful to you.

I have a spreadsheet pricing program available at the following link. CLICK HERE.

To see more of our parking lot striping articles CLICK HERE.

Glass Beads to Make Parking Lot Stripes / Lines Reflective AASHTO

Reflective Glass Beads – Adding Reflectivity to your Lines.

glassbeads3

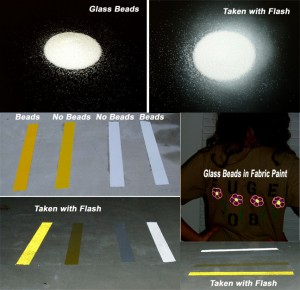
You have probably noticed that the painted stripes on the interstate or local roads light up when your headlights hit them.  The lines light up due to reflective beads embedded in the surface of the paint or thermoplastic used to stripe the road.  To make the lines reflective glass beads are distributed on top of wet paint or hot thermoplastic at a rate of about 6 pounds to the gallon of paint. When light hits the small glass spheres they reflect back a portion of that light to the source.

REFLECTIVE GLASS BEADS

Glass beads or spheres are the most common and oldest way of reflecting light in commercial applications. Thousands of small glass beads embedded in traffic paint will cause it to light up when automobile lights hit it. Because of their rounded parabolic shape and clarity, each glass bead reflects light back to the source.

AASHTO reflective traffic beads are designed to be added to the surface of traffic paint to make it retro-reflective. Standard AASHTO  Highway Spheres are rated as a type 1 bead.  (In comparison, type 3 beads, which are brighter,  are used for airport runways.)  The addition of these glass spheres has a dramatic effect on the night time visibility of lines and painted markings.

The recommended rate of application is 6 pounds per gallon of traffic paint. The beads are partially embedded by sprinkling them  ON TOP of wet paint or hot thermoplastic. They provide a sharp degree of reflectivity in wet or dry conditions. These are the same beads you will see at night on interstate highway lines. The glass beads can also be used in a variety of other applications where reflectivity is desired. Whenever they are distributed on top of wet paint the surface becomes reflective. They have beome very popular in craft type applications.

ADA Parking Lot Striping Requirements & Guidelines – Part 2

vanlift

ADA Design Guide 1 – Restriping Parking Lots

Accessible Parking Spaces

When a business, State or local government agency, or other covered entity restripes a parking lot, it must provide accessible parking spaces as required by the ADA Standards for Accessible Design. Failure to do so would violate the ADA.

In addition, businesses or privately owned facilities that provide goods or services to the public have a continuing ADA obligation to remove barriers to access in existing parking lots when it is readily achievable to do so. Because restriping is relatively inexpensive, it is readily achievable in most cases.

This ADA Design Guide provides key information about how to create accessible car and van spaces and how many spaces to provide when parking lots are restriped.

Accessible Parking Spaces for Cars

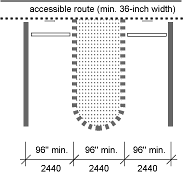
Accessible parking spaces for cars have at least a 60-inch-wide access aisle located adjacent to the designated parking space. The access aisle is just wide enough to permit a person using a wheelchair to enter or exit the car. These parking spaces are identified with a sign and located on level ground.

Van-Accessible Parking Spaces

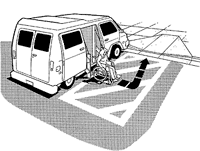
Van-accessible parking spaces are the same as accessible parking spaces for cars except for three features needed for vans:

a wider access aisle (96″) to accommodate a wheelchair lift;

vertical clearance to accommodate van height at the van parking space, the adjacent access aisle, and on the vehicular route to and from the van-accessible space, and

an additional sign that identifies the parking spaces as “van accessible.”

One of eight accessible parking spaces, but always at least one, must be van-accessible.

Features of Accessible Parking Spaces for Cars

Sign with the international symbol of accessibility mounted high enough so it can be seen while a vehicle is parked in the space.

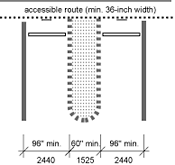
If the accessible route is located in front of the space, install wheelstops to keep vehicles from reducing width below 36 inches.

Access aisle of at least 60-inch width must be level (1:50 maximum slope in all directions), be the same length as the adjacent parking space(s) it serves and must connect to an accessible route to the building. Ramps must not extend into the access aisle.

Boundary of the access aisle must be marked. The end may be a squared or curved shape.

Two parking spaces may share an access aisle.

Three Additional Features for Van-Accessible Parking Spaces

Sign with “van accessible” and the international symbol of accessibility mounted high enough so the sign can be seen when a vehicle is parked in the space

96″ min. width access aisle, level (max. slope 1:50 in all directions), located beside the van parking space

Min. 98-inch-high clearance at van parking space, access aisle, and on vehicular route to and from van space

Minimum Number of Accessible Parking Spaces

Table showing the minimum number of accessible parking spaces. Text following contains contents of the table.

Location

Accessible parking spaces must be located on the shortest accessible route of travel to an accessible facility entrance. Where buildings have multiple accessible entrances with adjacent parking, the accessible parking spaces must be dispersed and located closest to the accessible entrances.

When accessible parking spaces are added in an existing parking lot, locate the spaces on the most level ground close to the accessible entrance. An accessible route must always be provided from the accessible parking to the accessible entrance. An accessible route never has curbs or stairs, must be at least 3- feet wide, and has a firm, stable, slip-resistant surface. The slope along the accessible route should not be greater than 1:12 in the direction of travel.

Accessible parking spaces may be clustered in one or more lots if equivalent or greater accessibility is provided in terms of distance from the accessible entrance, parking fees, and convenience. Van-accessible parking spaces located in parking garages may be clustered on one floor (to accommodate the 98-inch minimum vertical height requirement).

Free Technical Assistance

Answers to technical and general questions about restriping parking lots or other ADA requirements are available by telephone on weekdays. You may also order the ADA Standards for Accessible Design and other ADA publications, including regulations for private businesses or State and local governments, at any time day or night. Information about ADA-related IRS tax credits and deductions is also available from the ADA Information Line.

Department of Justice

ADA Information Line

800-514-0301 (voice)

800-514-0383 (tty)

Internet

You may also review or download information on the Department’s ADA Internet site at any time. The site provides access to ADA regulations, technical assistance materials, and general ADA information. It also provides links to other Federal agencies, and updates on new ADA requirements and enforcement efforts. Internet address:

www.usdoj.gov/crt/ada/adahom1.htm

Reference:

ADA Standards for Accessible Design (28 CFR Part 36):

§ 4.1.6 Alterations;

§ 4.1.2 Accessible Sites and Exterior Facilities: New Construction, and

§ 4.1.6 Parking and Passenger Loading Zones.

Striping Cement and Concrete Surfaces in Factories, Warehouses and Parking Lots

From time to time you may  be called upon to stripe cement warehouse or factory floors or cement parking lots.  Inside warehouses, regulatory agencies require that floors be marked for safety purposes. Striping cement floors is always a challenge for a few reasons.  These reasons are: slick cement, curing compounds, grease and dirt.  The good news is that with a little preparation, these issues can be offset.  The first thing you want to do is test the surface.

Water Test – To see if the concrete surface you need to stripe is ready for paint or thermoplastic you can use this basic test.  Take one tablespoon of water and apply it to the floor.  If the water it soaks in in just a few second then your floor is porous enough to accept a coating.  If it sits there for several minutes then paint or thermoplastic will not perform well since it cannot grab the surface or soak in.  Keep in mind that if water can’t soak in then the paint will not either.

Problems –

First, warehouse and factory floors are generally smooth much like your garage or house foundation floor.  The finishing process that is used to smooth the cement to a slick finish closes the pores in the cement and prevents moisture from soaking into the floor like it would on say a driveway or other rougher cement surface.  The problem that this creates for striping is that the paint has little to grab and subsequently will begin to flake or chip off.  This problem is accelerated by forklift and equipment traffic.

Second, when cement is poured a curing compound is often used to help the concrete hold in moisture so that it cures slow and  gains proper strength.  This compound is present on the surface of the foundation and remains indefinitely.  The curing compound can prevent paint or thermoplastic from adhering to the surface.

Third, over time cement becomes dirty and greasy.  These types of surfaces tend to not hold paint well.

Solutions –

The problem of slick cement or curing compounds can be overcome via the use of a concrete grinder or scarifier.  These machines take off from 1/16 to 1/8 of an inch of cement.  This removes the top layer of the cement that would have the most curing compound in it and also roughs up the surface so that paint can grab it.  Running a grinder or scarifier over the areas where you want lines will increase paint and thermoplastic adhesion substantially.  After you scarify a strip for painting you can try the water test again.  At this point the water should soak in to the cement more quickly than before.

Dirty and greasy cement can be cleaned using a degreasing compound and a pressure washer.  You can also use a degreaser, a scrubber and a water hose.  Once the surface is clean just let it dry for a few days and then apply your paint.

How to Remove Traffic or Parking Lot Striping Lines

Certain jobs will involve removing existing lines on asphalt or cement parking lots or roads. There are two methods for doing this. One is the cover up method and the other is the removal method.

Covering up stripes simply involves matching some paint to the color of the surrounding asphalt or cement and then spraying the stripe. A couple of coats will assure that the stripes stay invisible for longer.

The second method involves completely removing the line. This is done with a grinder or scarifier. These machines simply grind the stripe down to the original asphalt or cement. They are adjustable so you can keep from going too deep into the surface. The video below shows one being used. We also have additional information on these machines at infozing.com/concrete .

How to Estimate Price Bid and Sealcoating Job

Pricing a sealcoating job is a simple process of multiplying the square footage in the lot by a price per square foot.  This price per square foot will range from .12 cents to .20 cents depending on a few factors.

The first factor is your market.  If it is very competitive that will push the price per square foot down.  If there is very little competition the price will go up.

Second, the condition of the lot affects the price.  A nice smooth, clean lot would be less per square foot.  A dirty, sandy, rough lot would be more.

Third, is the amount and quality of the sealcoat you give a customer.  If you just do a single coat with very little sand you should charge less.  If you do two full coats with lots of sand bound into the mix you should charge more.  The second way will outlast the first by at least double.

Fourth, if your price includes striping the lot you would charge more.  If you break that out or if someone else stripes it you would charge less.

Fifth, the size of the lot will affect the price as well.  Small lots are charged a premium and small lots get a volume discount.

How you put it down is not relevant.  It is better for you to have efficient equipment and this will help you to make much more per hour of your time but it should not change the customers price.

Here is how I would price a job.

Lot size – 100 x 200 = 20,000 square feet

Lot Type – Clean lot.  No sand. Easy to close off lot.  No cars.

Job Type – 2 full coats.  Both with sand and some latex additive.  Striping included in  price.

20,000 x .17 = 3,400

Parking Lot Striping / Sealcoating Business Profits / Profit / Income Potential

A lot of people want to know how much money they can make striping and sealcoating parking lots.  This is a good question and a smart one to ask because it is important to know what your earning potential will be before you invest a lot of time and money setting up a business.  While there is not way to give an exact figure, it is possible to show you a typical scenario based on our experience.  Also, keep in mind that striping and sealcoating profits depend on what part of the country you are in and how many months out of the year you can work.   Here is a typical scenario.

First, it is going to take some time to get your marketing plan into action.   If you are in a good area with lots of parking lots and you are actively identifying  jobs and sending out letters you can expect to get at least one call a week  after a month or so of marketing and 2-3 calls a week after a few months. These will be calls asking for a quote on a parking lot job.  Some will be for striping select areas, some will be for small to medium striping jobs, some will be for large striping jobs, some will be for pothole repair, some will be sealcoat/stripe jobs and so on.  The more you go out the more calls you will get.  After being in business a while you can expect the number of calls to increase just via word of mouth and repeat customers.   Make sure to read our article on marketing your sealcoating / striping business.

Lets say you put out bids on two jobs a week and the average total for those two jobs is $1,800.  (some weeks you may do a 10 space lot and some weeks you may do a 10,000 sq ft sealcoat/stripe job)  Over a period of 52 weeks that would be $93,600 in jobs bid.  You will normally get about 90% of the jobs you bid since for most jobs you are the only bidder.  That is a total of $84,240 per year in revenue.  Your margins on striping are about 90% and they are about 80% on sealcoating.  To be conservative lets take 80% of the entire revenue number.  That would be about $67,000 per year.   Keep in mind that this is with you only doing a couple of jobs a week or one big job.  Some large striping jobs run $6,000 and some sealcoating jobs run over $10,000 so it is easy to see how the average can climb very high.

Lets look at it another way.    You will make about $50 per hour for your time striping or sealcoating.  That is an average for the industry.  This would be time on the lot actually working.  If you are successful at marketing you can keep jobs lined up to where you can work  6 hours each day on a lot.  If you only work Monday – Friday that is 30 hours per week times $50 which is $1500 per week times 52 equals $78,000.  You can make more than this but it would involve having multiple crews out.  Here is how that would work.

Lets say you have two crews of two men per crew out working 30 hours each on a lot.  Each man would theoretically be pulling in $50 per hour profit for you.  However, workers are often not as efficient as you would be so lets say they bring in $40 per hour.  That is $80 per hour per crew or $160 per hour for the two crews.    If you pay each person in the crew $15 per hour then your payroll for the week would be $2400. (note that this is $15 time a 40 hour week x 4 to account for 2 hours of set up each day)  Your profit from the crews work would be $4800 less the $2400 your paid them for a total of $2400 per week.  This times 52 is $124,800.  Now keep in mind that this does not include you working.  If you added your labor on the lot the total would be $78,000 plus $124,800 or $202,800.

This is an optimum scenario and probably leans towards the liberal side but it gives you an idea of how much you can make and how to make more than if you just worked yourself.

Workers Comp / Compensation Insurance or Exemption

In the previous article we discussed obtaining liability insurance to not only cover accidents that may occur but also to assist you in getting jobs. In this article I want to cover Workers Comp Insurance and how it can protect you and your customer and also how it can assist you in getting jobs.

Workers Comp is designed to cover your workers or employees in the event they are injured on the job. If one of your employees hurts their back picking up paint buckets or trips and breaks an arm workers compensation insurance will pay them until they recover and can work again. The advantages of workers comp for companies that have employees that may get injured on the job are obvious. If you are on someone’s property workers comp will insure that if your employee is injured your insurance will cover them and not the property owners policy. This is a big deal to most companies that you will work for.

The first thing you should do is go to your states worker compensation internet site and see what the requirements are. Some states force you to carry workers comp for your employees and some don’t. Some make you carry it your self and some allow for you to be exempted. In Florida for example, all construction related businesses must carry workers comp even if they only have one employee. However, in Florida, corporate officers and LLC owners can be exempted. (exemption must be applied for) If you are a sole proprietor or partnership you cannot get the exemption.

If you are not required to carry workers comp then you have to decide whether it will be beneficial to you. There are two things to consider. Number one. Do you want to be responsible for the injuries of your employees or do you want to be relieved of this responsibility via workers comp insurance. Number two. Will having workers comp help you get jobs. The answer is yes it will. The owners of most larger properties will not let you work on their property unless you show them that you have “liability insurance” to cover them if you damage something or injure someone and “workers comp” to cover your employees if they get hurt on the job. If you are a small corporation or LLC you can get the exemption card and that will suffice. In most cases, the extra income you can make from additional jobs will more than cover the extra cost of insurance.

If your company is required to have workers comp and you don’t carry it you can be fined by the state plus you will lose out on most large jobs. If you don’t have to have workers comp you will not be fined but you will lose out on the same jobs. The choice should be clear but the best thing to do is consider your options and make the decision that will both boost your bottom line and cover you from unnecessary liability.

Obtaining a Liability Insurance Policy

For many companies, liability insurance is an option. However, for striping companies it is more of a necessity. Having a liability policy will accomplish two goals. First, it will cover you against liability if you damage something on someone else’s property. For example, say you get too close to a car and scrape it or say a person slips in your wet paint and injures themselves. You are going to want to be covered for these events even though they are unlikely. With that being said I want to go over the main reason for having liability insurance. It helps you get jobs! I can’t tell you how many times I have bid a job and been asked whether I carry liability insurance. If I did not have it I would not have gotten the jobs. Other striping companies that don’t carry it are now no longer competition on the nice jobs just because of that one item. (Another item they will ask for is workers comp or a workers comp exemption. I will cover that in the next article.)

The question many stripers have is what type of policy to get. If you are mainly striping and doing a little sealcoating manually now and then you may want to look into a specialty painting contractors policy. If you begin using heavy equipment that can injure someone you will need to step up to a more comprehensive policy. An insurance agent can help you determine which is best for you. Find an agent you can trust and make sure they don’t sell you more or less than what you need. The liability limit is something that customers look at. Get what you can afford and if you need to bump it up you can do that by calling your agent.

In conclusion, for a small striping company the liability coverage that a policy provides is comforting, but very few companies actually do any damage or hurt someone where they use that part of a policy. The main reason for having the policy would be making the customer happy and getting  jobs. For a larger company with heavy equipment liability is a must and is the most important reason to carry insurance. If your machines injure someone the policy will cover you. Without it you would be out of business. Getting jobs would be secondary in this situation.

Used Parking Lot Striper / Sealcoating Equipment

Used equipment is often available at prices that are a fraction of the retail cost. The question is whether this equipment is worth the investment. The answer depends on what equipment you are talking about, the condition and the price. Used, worn out equipment will be more of a headache than it is worth even to someone who knows how to work on equipment. However, well maintained, quality, rugged equipment may be a valuable asset to your company. Simple machines like roll around blowers, sealcoating tanks and trailers are fine to buy used. They can be repaired and refurbished and will last a lifetime in many cases. More complicated machines like stripers are important to your company and you cannot afford for them not to work. Equipment like this may need to be purchased new or refurbished.

The more mechanically inclined you are the more you can rely on used equipment provided it is priced right. If you are not mechanically oriented then used equipment may not be for you. Especially if the equipment is key to the operation of your company. If a blower stops working, that is easily remedied with a backup blower but if your striper stops working and needs to be rebuilt then you are out of business for a week or so. This can mean thousands of dollars in lost revenue.

Some companies will have a nice primary striper and then as a backup they may purchase a used simpler striper for times when the main unit is down. The Trusco Manufacturing machines are nice for this purpose. They are simple and very easy to work on and make a great primary or backup machine. The same applies to sealcoating machines. Since this equipment is so important, a backup method of application is often a good investment. Used equipment is fine for this purpose.

Lastly, before you buy a lot of equipment, make sure you have a place to safely store it. Stripers need to be stored out of the weather and sealcoating equipment needs to be maintained and protected during hard freezes. Take care of your equipment and it will take care of you. NOTE – a good place to find used equipment is www.pavermarket.com

Buying a New or Used Parking Lot Striping Machine / Striper

There are quite a few parking lot striping machines on the market. The decision of which to buy can be a difficult one and is influenced by both your budget and your striping needs. This article is meant to point you in the right direction. We have reviewed many of the striping machines on the market today and have individual articles posted in our “Parking Lot Striping Machine Review” category. You can see these reviews by CLICKING HERE.  Also, when looking for a machine you will come across both new and used striping equipment (stripers).  A used machine is fine but a worn out machine is not.  Make sure you are getting a good quality used machine and not someones problems.  Also, make sure it is a good brand like Graco, Proline, Kelly Cresswell or Trusco Trueline.  You need to be able to find parts.

Line striping machines can be broken down into four basic categories:

The first category would be machines that are not capable of doing commercial work. This would be the spray can type machines or the type with a paint roller instead of a spray head. These machines are fine for what they were intended to do but should not be mistaken for commercial production machines. That is not to say that you should not buy one. I say this because the little machines sometimes come in handy for different odd spray jobs you may encounter. I use one myself. When I have one last line to do and there are cars in the way I will take out my spray can striper and do the last stripe. I also use it for putting down the small dotted lines for curved stripes. Then I use my big machine and connect the dots. The reason you would not use the machine for commercial work is mainly the expense of laying down a stripe. You have to go over the line at least twice to get a satisfactory stripe. The cost per stripe is several times more than a standard machine.

The next type of machine would be the low end commercial machine. These would be the pump up models for the most part. I would also put some of the small airless machines in this category. These machines will put out a good stripe but are not adequate for high production work. Trusco Manufacturing has a machine called the Model 20 which is in this category. It is great for shopping center owners who want to maintain their own parking lots and for small striping contractors doing small jobs but for large jobs it is a little on the small side. You would need to pump it up every few stripes which can become tedious after a while. I have seen where people have purchased the pump up models and later convert them with a pressure tank. This seems to work fine but buying a machine that is made for higher production work may be the better solution. There is a gasoline powered machine in this class called a Powerliner that has a small Robin-Subaru engine. It will put out a nice stripe, but is still a step below a full size model.

The third type of machine is what I would call a standard high production or full size parking lot striper. These are machines that are capable of putting out high production. There are several companies that manufacture these machines. Graco is probably one of the more popular companies. They manufacture the Graco Line Lazer or Laser. It has a powerful Honda engine and a high pressure pump that will pull paint straight from a bucket and spray perfect lines. Proline, Titan, Airlessco and Trusco all manufacture nice commercial machines. Kelly Creswell also makes an air atomized unit that is popular. These machines almost always have a detachable sprayer for doing curbing and stencils. You can also angle the spray head for curbs and bumpers. Having a high production striper can save many valuable man hours per job. The extra money you spend on the nicer machines is often returned to you in labor cost savings within the first year.

The last type of striper is going to be the large road stripers. Many of these are the type you ride on, tow or mount to a truck. While they are a necessity for road striping, they are too large for parking lot striping.

In conclusion, if you are only planning on doing small lots and always plan to keep your company small then the small pump up type striper is fine. If you are wanting to make more money and stripe larger lots the full size units are a must. Also, preventive maintenance is crucial with the stripers. Clean them after each use and keep the engine and pump maintained. If you can learn to work on your parking lot striper yourself, you will not only save on repairs but you will also reduce company downtime which is normally more costly than the repair itself.

ADA – Americans With Disabilities Act

The Americans with Disabilities Act also known as the ADA makes it illegal to discriminate against a person with disabilities in areas of employment, transportation, public accommodation, communications, and government activities. In this article we will be discussing the implications that this act has on parking lot striping companies. In other words, what do you have to do when striping a parking lot to be compliant with the ADA.

Accessible Parking Spaces for Cars

Accessible parking spaces for cars must have at least a sixty (60) inch wide access area located next  to the designated parking space to permit a person using a wheelchair to enter or exit the car. These parking spaces need to be clearly marked with a sign and need to be located on level ground.

Van-Accessible Parking Spaces

Van-accessible parking spaces are to be the same basic layout as car accessible parking spaces except for three additional features needed for vans:

The access aisle should be ninety six inches (96″) instead of sixty to accommodate a wheelchair lift

Sufficient vertical clearance to accommodate van height at the van parking space and the adjacent access aisle. This vertical height is also needed on the route to and from the van accessible space.

Finally, an additional sign prominently placed that identifies the parking space or spaces as “van accessible.”

Minimum Number of Accessible Parking Spaces Required

ADA Standards for Accessible Design 4.1.2(5)

Total Number of Parking Spaces Provided (per lot) (Column A)

Total Minimum Number of Accessible Parking Spaces (60″ & 96″ aisles)

Van-Accessible Parking Spaces with min. 96″ wide access aisle Accessible Parking Spaces with min. 60″ wide access aisle
1 to 25 1 1 0
26 to 50 2 1 1
51 to 75 3 1 2
76 to 100 4 1 3
101 to 150 5 1 4
151 to 200 6 1 5
201 to 300 7 1 6
301 to 400 8 1 7
401 to 500 9 2 7
501 to 1000 2% of total parking provided in each lot 1/8 of Column A* 7/8 of Column A**
1001 and over 20 plus 1 for each 100 over 1000 1/8 of Column A* 7/8 of Column A**

Additional Features of Accessible Parking Spaces for Cars

A sign with the international symbol of accessibility must be mounted high enough so it can be seen while a vehicle is parked in the space.  Most counties have the exact height they require in their code.

If the accessible route is located in front of the space, wheelstops should be installed to prevent vehicles from reducing the width to below 36 inches.

The access aisle which is to be at least 60 inches wide must be level with no more than a 1:50 maximum slope in all directions.  It must be the be the same length as the parking space or spaces it serves and must connect to a route to the building. Ramps cannot extend into the access aisle.

The Boundaries of the access aisle must be marked. The end of the access area may be squared off or a curved shape.

Finally, two parking spaces can share an access aisle.  The access area would be between the two cars.

Three Additional Features for Van-Accessible Parking Spaces

Sign with “van accessible” and the international symbol of accessibility mounted high enough so the sign can be seen when a vehicle is parked in the space

96″ min. width access aisle, level (max. slope 1:50 in all directions), located beside the van parking space

Min. 98-inch-high clearance at van parking space, access aisle, and on vehicular route to and from van

Location of Accessible Spaces

Accessible spaces must be located on the shortest accessible route of travel to an accessible entrance. In situations where buildings have more than one accessible entrance with adjacent parking, the accessible spaces must be dispersed and located closest to these entrances.

In instances where accessible parking spaces are added in an existing parking lot, the spaces must be located on the most level ground and must be close to the accessible entrance. An accessible route has to be provided from the accessible parking to the accessible entrance. An accessible route should never have curbs or stairs.  Also, it must be at least 3- feet wide, and have a firm, stable, non slip surface. The slope along this route should not be greater than 1:12 in the direction of travel.

Accessible parking spaces may be clustered in more than one lot provided equivalent or greater accessibility is provided in terms of distance from the accessible entrance, parking fees, and convenience. Van-accessible parking spaces located in parking garages can be clustered on one floor if necessary to accommodate the ninety eight (98) inch minimum vertical height requirements.

Making your own Parking Lot Stencils

In this article I will to discuss creating your own parking lot logo & handicap stencils out of LDP or Low Density Polyethylene. This is not a complicated process and the most difficult part is finding the materials. Making your own parking lot stencils is very simple and very economical. You will need to locate sheets of LDP or Low Density Polyethylene. It flexible translucent material. Look in the phone book or search google for “plastics” or “commercial plastics”. You should find companies that carry plastic in sheets, rolls, etc.. GE Polymer Shapes is one of the most popular sources. A 4 x 8 sheet runs around $20. The material looks and feels like the plastic lid on a Folgers Coffee Can. Clear but also a little milky. You can see through it a little which is important as we discuss the next step.

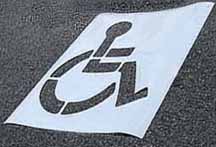
Once you have bought some LDP sheeting you will simply take it to an existing marking like a handicap logo and lay the LDP over the logo. Then trace it out with an indelible marker. Take the sheet home and score around the outline with an exacto knife, pierce a corner and then peel the piece out. If you have cut deep enough the scored section will peel right out. Using this method you can create almost any stencil. The stencils your create will be almost indestructible because of the strength of LDP. You may want to consider purchasing stencils with small letters or lots of letters just to save the labor. As far as finding sample logos to trace, you should have more luck and get more accurate markings if you use parking lot markings that have just been put down and inspected. There is a better chance of these markings being compliant with current code.

To see more of our parking lot striping articles CLICK HERE.

How to Stripe a Parking Lot

This is going to be a very basic step by step article that goes through the process of striping a typical parking. This is intended to give you an idea of what you will be doing on a typical job.

1. Set up for the job. The first thing you will be doing is setting up your trailer for the job. Load your striper, paint, etc.. Everything you are going to need from paint to Gatorade is going to be either in the trailer or the back of your truck. Forgetting important items either means a trip back home or a trip to the store.

2. Arrive at the job. When you arrive at the job you will unload your striper and set up a work area. I like it to be near grass and water if possible. That gives me a place to clean my machine without getting paint on the parking lot. I normally go ahead and fill my striper with paint and run a test line or two. I also pull out any stencils that I will be using that day or night. Also, get your blower out and gased up.

3. Set up a Striping Zone. Next I choose an area to stripe that is nearest to me and I enclose it if necessary with caution tape, cones and whatever it takes to keep cars and people out. I then blow off the lines and make sure everything is ready for paint.

4. Striping the Parking Lot. Now I power up the machine and start striping. I always stripe in a logical progression. For example, if you have nose to nose parking with a center line dividing the two rows of cars you would never stripe the center line first. If you did then you would have to wait 15 minutes for it to dry before you could do any more striping. Instead, start doing the 40 foot lines and work your way to the end. Then you can roll back to the other end of the line and do one line down the center to finish off that section. You may have to wait a little for the last lines to dry but if you don’t want to wait you can knock out a few stripes in the next section, then roll back to section one and finish the center line. It is all common sense.

5. Move on to the Miscellaneous Items. Once the main stripes are done I start working on all the miscellaneous items. I do the white painting first, then go to yellow or blue if necessary. If you do white first then you can do a basic flush and put in yellow or blue. If you do yellow or blue and then want to go to white you have to completely clean out the machine or you lines will have a blue or yellow tint to them. Again, common sense. I usually go to yellow next and do any striping that needs to be done. Usually fire lanes and curbing. Then I move to blue after a decent flush of the machine. I do the handicap lines. I am then done with my machine. I clean it and put it away.

6. Rolling out any arrows or symbols. Once everything else is done and my machine is put away I take out a 3 inch roller and a gallon of paint (blue, white or yellow) and I start on the arrows, words, handicaps, etc.. If the handicap symbol is already there, which it normally is, I just use the roller and freshen it up. It always looks perfect and I don’t need a stencil. If its not there I have to use a stencil at least to get the outline down. Once I am done with my miscellaneous items I close the gallon bucket and put my roller in a bucket of water and close the lid.

7. I do one last check of the lot and then go home.

Tips –

Watch out for drunk people. They will go through any barrier you can set up. To keep them out try blocking off the actual entrance to the parking lot. Then also rope off your stripe zone. That is about all you can do.

Watch out for the parking lot vacuum truck. If you stripe at night you will most likely see the super vac truck. He will run over the entire parking lot so it is important to catch him before he does.

Watch out for the dumpster truck. Same rules will apply. Keep in mind these people are sometimes in a semi sleep state and are just running on auto pilot.

Watch out for people. If you are striping while the store is open you have to be especially careful of pedestrians. They will not even know you are there and will walk right through your paint and into the building. When near pedestrians work on small areas at a time and exercise extreme caution. Not only will they walk in your paint, they will also slip and fall in it.

To see more of our parking lot striping articles CLICK HERE.

Purchasing your Equipment

What type of equipment to purchase is probably one of the most difficult decisions that you will make as you start your business. Spending too much can leave you close to insolvent before you even get your first job. Spending too little can prevent you from being able to do the work people are paying you to do.

We had previously discussed equipment in the article on funding. I have listed below the basic equipment that an average striping and sealcoating will need.

1. Sealcoating machine – $100 – $3,000 – $20,000 (manually – affordable machine – expensive machine)
2. Striping Machine – $600 – $6,000
3. Trailer – $600 – $3,000 (5 x 8 trailer or an enclosed trailer) *
4. Blower – $50 – $500 (hand blower or blower on wheels)
5. Traffic cones – $5 – $15 each (you will need 6 – 10 cones)
6. Stencils – $100 (see article on making your own stencils)
7. Rollers, brushes, paint trays, measuring tape, angle tool, black spray paint, marking paint or crayon, roll of rope for making long straight lines – $100

* My favorite setup is a nice truck towing an enclosed cargo trailer with a ramp gate. Your equipment stays dry and safe and the sides and back of the trailer are great places for advertising.

These are the basics. Don’t try to skimp on a blower and use a broom. Your time is more valuable than that. Don’t think you are going to get your equipment out to a site with a very small trailer or in the back of a car or Jeep. You won’t. Don’t try to put down lines with a roller or a small spray can striper. The job will not look professional. Don’t skimp on supplies and then wait until you get to your first job at midnight to acquire them. Only Walmart is open.

Remember, time is money. Your time on the job is valued at about $50 per hour. If you save $50 and spend two unneeded hours then you are $50 in the hole and will go deeper each time you do a job. Good equipment will save you time on the job.

Think like a successful businessman. Don’t cut corners when you don’t have to. Be thrifty but not cheap. If you don’t need it, don’t buy it but if you know you are going to need it, get it.

To see more of our parking lot striping articles CLICK HERE.

Making Straight or Curved Lines

You would think that making straight lines with a striping machines would be automatic. Try this. Close your eyes while you are mowing your lawn and walk about 40 feet. When you open your eyes you will still be going the same direction but your line will most likely not be perfectly straight. The same applies to a parking lot striping machine. It is made to go straight but must be guided by the operator in order to create a perfect line. To create a perfect line with a striping machine you have to follow a benchmark like the old stripe, a chalk line, painted dots or a cord pulled tight. Again, when you are mowing grass, you always follow the edge of the last row. If you pull away you will miss areas and have to go back. If you overlap too much you will create more work for yourself. So a good lawn mower keeps their eye focused on the last row and follows that exactly. The same thing applies for striping.

For re-stripes the old line is normally clearly visible and is easy to follow. If it is a little crooked you can do some correction with no additional benchmark. However, if it is too far out you really should either pop a chalk line and follow that or pull a cord tight and use that as your benchmark.

I have personally found that using a chalkline is too time consuming and normally requires two people to do. My favorite way to mark straight lines is to take a roll of cord and pull it tight from one end of the line to the other.

I use an extension cord reel that you can get at Lowes or Home Depot and I roll a hundred or so feet of rope onto it. If I have someone with me I weight my end down and have them hold the other tight. If I am by myself I weight both ends down. After I stripe the line I just move both ends over and pull tight.

For curved lines I use dots sprayed on the ground with a spray wand. I double check the marks then start at one end and connect the dots to the other.

To see more of our parking lot striping articles CLICK HERE.

Advertising, Marketing and Promoting Your Business

Once you have gone through all the tedious steps of setting up, licensing and funding your business, you are ready to start working on a marketing program. Advertising, cold calling, an internet site, yellow page ads, logos, business cards, flyers, signs, and word of mouth are all components that make up what people refer to as “marketing”. Marketing is simply a way to bring supply and demand together. In other words, you are able to stripe a parking lot at a fair price. In your town there are hundreds of parking lots that need to be striped. Your marketing program is what will connect you to these customers. A good marketing program should have the following characteristics:

– It should professional
– It should clearly convey your message
– It should be as targeted as possible
– It should be as cost efficient as possible
– It should be as labor efficient as possible
– It should be systematic (versus disorganized and sporadic)
– It should get quick results
– It should get long lasting results

Fortunately, marketing a parking lot striping / sealcoating business is very simple and straight forward. This is true for two reasons. Number one, your potential customers are easy to identify. Number two, they are easy to reach or contact.

The first task you need to complete is to make a list of potential customers. They would consist of anyone with a parking lot and more specifically, anyone with a parking lot that needed striping. Finding these customers simply involves driving around your market area and recording addresses and names. This is the beginning of a process that will allow you to reach these potential customers with affordable targeted advertising. To reach other customers that you may have missed you would use a broader based advertising program so that customers that you did not identify initially but need striping could easily find you. I will begin with some target marketing ideas and then move on to a broad based marketing.

Target Marketing

To reach potential parking lot striping or sealcoating customers using a target marketing approach you can follow these steps.

1. Drive around your market area and list of parking lots that need striping. Record the addresses and any other information that you think is pertinent. For example, does the parking lot need striping only or sealcoating also. Are there any potholes. Maybe you want to take a picture for you records and for reference. Wherever you go you should be looking for prospects. Your wife, parents, friends, etc.. can also be very helpful in this effort.

2. Once you have compiled a list, go to the property appraisers internet site and enter the address to obtain the property owners name and address. This is sometimes out of the area which is fine. The owner is almost always the party that is ultimately responsible for keeping the parking lot in good condition. If a management company handles the property they will often forward the information you send them to that company. For shopping centers, call the number on the “for lease” signs in the windows of available units. Obtain the address and send a letter to the company that manages the project. There is no problem sending a letter to the owner and management company. For hospitals, malls, factories, and other similar businesses use the main address for the facility and write on the envelope “Attention Maintenance Supervisor”.

3. Send marketing packages to the individuals and companies that you have identified. The package should outline what your company does and present an offer to stripe or sealcoat their parking lot. Include your business card and any other information such as number of years in business, jobs you have done, hours of operation, insurance and workers compensation information. Make a list on your computer of who you have sent letters to. As you receive responses make a note of them for tracking purposes. After a few months resend letters to companies who have not responded. If you send out marketing information every few months to a person it should not be an imposition. If you send letters weekly it would be. If you notice that the lot has been striped just mark them off the list. A spreadsheet of composition book can be used to track you marketing efforts. This will be an ongoing process that will never stop. You may slow it down or speed it up if necessary.

This type of targeted marketing will usually get you all the jobs you need in a fairly short amount of time. All for the cost of a few rolls of stamps and some gas money.

Broad Based Marketing

Many times there are lots that need striping that you will not find on your own. They may be off the beaten path or out of your area. If a person needs their lot striped or sealcoated and you do not find them then they are going to need to find you. Broad based marketing does this by making your business information available to anyone who looks for it. They should not have to look very hard to find you. In fact if you are the easiest to find you will always get the first call. The idea is to accomplish this without spending a fortune. The yellow pages would be an example of broad based advertising. You can find below several broad based marketing ideas starting from the least expensive way to the most expensive way.

1. Google Local Business. If you search on www.google.com for “google local business” and you should find links that will allow you to place your business on googles special local business section for free. When someone in your area types in parking lot striping your business along with pertinent information about your company will come up.

2. Yahoo Local Business. Do a search on www.yahoo.com for yahoo local business and you will get links into their free business listing area. This is very much like the google service and it is also free. Look for the “add business” link at the bottom of the page.

3. Craigslist.org is a free advertising service that is very popular and available all over the country. It is localized in that there are special craigslist pages for most major cities in the US. Advertise on the one nearest you.

4. Business Website. Having your own website is and not expensive and is a great way convey large amounts of information to potential customers. There are many good companies that have online web building tools for you to use. Use a lot of content because google matches customers to you based on content. Make sure your title includes the city you are in. You would use something like Affordable Parking Lot Striping Los Angeles CA . This will let the search engines know where you are. Look at other striping company websites and see how they are laid out and you should get a good idea of how you want yours to look.

5. Local newspaper business & service directories. Most papers have a local business/service directory that are fairly inexpensive to advertise in. Put your business in as many of these publications as you can afford. It is often worth the money to pay a little extra to make your ad more visible than the rest.

6. Yellow Page advertising. This used to be the best way to reach people. It has also always been very expensive. Now, with the internet it has become less important. If you have a business phone you will most likely get a free listing. If you pay a little more you can get a larger inline listing. I personally would recommend an in column type ad or just pay extra to make the standard free ad bold.

7. Signs on Telephone Poles or the Roadside. Most counties do not allow very much of this but check with yours to see. Even if they are banned in your area you can always find a legal place to put them. A sign company can make affordable small signs for you that say Parking Lots Striped and then your phone number. This type of advertising it is fairly effective and will normally get you a few jobs each year.

Finally, bidding jobs is a very important part of marketing. It is the part of your marketing program that everything else leads up to. Sort of like stepping up to home plate. Dress nice but not too nice. Come in your work truck and not your wife’s Lexus. Make sure you show up on time. Make sure your bid sheet is neat and professional. Itemize different parts of the job without giving too much detail or making it confusing. Make sure the customer has all the information they need to make a decision. Include your business license , insurance and workers comp info on the letter at the bottom so they know these items are covered.

If you follow these basic steps you should be able to stay as busy as you want to be.

To see more of our parking lot striping articles CLICK HERE.

Finding Traffic Striping Paint

Finding affordable, quality parking lot striping paint is a must for any striping company. Every dollar extra you spend on paint comes out of your profit and goes into the paint stores pocket. Here is the most amazing thing. You will be buying more striping paint than they do. They buy from the manufacturer and sell to you. It should be the other way around.

In this article I want to cover the up front task of locating parking lot striping paint or traffic paint at a fair price. The information in this article is something that most paint retailers don’t want you to know. They would prefer you purchase your traffic / striping paint from their store at $15 – $20 per gallon instead of you getting it straight from the manufacturer and paying $5 – $10 per gallon. I also want to go over how to get your paint to dry faster in cool weather or at night. This will prevent you from having to buy more expensive quick dry paint.

Since a striping companies main product is paint, it goes without saying that you will be going through a lot of it. Mostly yellow and white and some blue and maybe a little red. In a given year you may go through hundreds of gallons of paint. Much more striping paint than an average paint store will sell or stock. They carry it for the once in a while user who just needs a gallon or five gallons. As a professional parking lot striper, you should never have to pay full price for paint.

Here’s how to find a manufacturer. First, visit several local paint stores and ask to see their traffic paint. Read the bucket and find out who the manufacturer is. Paint is heavy and expensive to ship so the manufacturer is normally going to be fairly close. Make sure to hit all the paint stores so you can develop a good list of traffic paint manufacturers. Write down the name of the companies, find the closest one with the best prices and call them. Set up an account and you are ready to go. You will find that their prices will be around $6- $9 per gallon. (At the time this article was written paint prices were up because of a resin shortage but this will not be permanent)

Also, try the internet. Search using Google for “paint manufacturers” or “traffic paint manufacturer”, etc.. There are several across the country and if you cannot find a local company you can always have a pallet of paint shipped direct. Shipping runs about $100 – $150 for a pallet.

Here is how you can get your paint to dry faster. Simply add a small amount of alcohol to it. NOTE – This is only applicable to water based or water borne traffic paints. Don’t try adding alcohol to oil based paints. We use Isopropol Alcohol from Kmart or CVS but you can also use other types. The paint manufacturer will normally let you know which type they use. I use about 3 ounces per gallon of paint or around a 16 ounce bottle for a 5 gallon pail. Again, check with the striping paint manufacturer about what alcohol is most compatible or do some tests yourself to determine compatibility. They will try to sell you their fast dry paint, but if you press them they will tell you what to use. I have been doing this for years and have not had the first problem. But again, make sure you test it out on a quart or so first. Note – fast dry paint straight from the manufacturer is fine but you will be carrying that plus your regular paint which doubles your inventory. Adding alcohol helped us to keep from having to carry two types of paint.

You may need to carry around $800 – $1000 in paint inventory. That number may need to be increased later depending on the size of your average job and how far you paint supplier is from you. That is around 15 – 20 five gallon pails of paint. Say 9 white, 9 yellow, and 2 blue. This is just an estimate based on our companies inventory level.

To see more of our parking lot striping articles CLICK HERE.

Financing Your Business

At this point you have calculated how much money you need in a commercial checking account to fund your business until it reaches a positive cash-flow. Now you need to obtain financing. To finance simply means to provide funding. Funding can come either from your own resources or from other resources.

Your business has the best chance of success if funded by your own resources (non debt related). This way you can focus on making your business profitable without the burden of debt or a partner. Resources can come from personal savings or the sale of stocks you own. Selling personal assets such as a boat or an extra car are also ways of raising capital. If your business is successful you can buy new boats and new cars.

If you are not able to fully fund the business from your own resources then you will have to resort to secondary sources. These sources can be personal credit cards, a bank loan, a business partner, or a silent partner.

Personal credit cards or bank loans can be expensive, but do allow you to maintain control of your business. Also, given the profitability of parking lot striping and sealcoating, they can normally be paid back quickly at which point you have control over the business and no debt. Many banks will finance equipment and some equipment companies will finance the machines for you.

A business partner is another source of funding. Keep in mind that with a partner you lose control of the decision making process as well as half the profits. Never take on a partner that adds nothing but money to a business. You will regret it later.

A silent partner is another way to finance that leaves you in control of the business. However, keep in mind that they are still a partner and will get a share of the profits. If you go this way make sure to pre-plan a buyout agreement so that as you become profitable you can buy their portion of the company back.

Finally, whatever form of financing that you choose, make sure you get enough money to fully fund operations to a point of profitability. Remember, running out of money equals going out of business.

To see more of our parking lot striping articles CLICK HERE.